Getting started
Welcome to codamAI headless cms.
Overview
Pre-requirements
For local development you can use docker-compose or run it as java application. We recommend to use docker-compose, because it is the easy way 😉
- your login / account data to codamAI
- empty git repository
- docker
- docker-compose
Create your first cms
Login to codamAI headless CMS module. You will see a list, and your registered licenses on top of the table. Click on "create" in the top right corner, and you can add a new CMS.

By adding a cms name (only A-Z, 0-9 and underscore allowed, because this will be the maven project name) and a description, you can create a new item. After creation is done, you will be redirected to the CMS explorer view.
Edit CMS Settings in the Explorer View
If you created or choose a CMS to edit, you run into the explorer view. On the top, you have the menu bar. Create models and enumerations, edit the project settings or deploy the application here.
On the left side, you have a navigation tree, for created models, enums and folder.
In the center you have tabs with open items.
Model View
Click on a model in the navigation tree will open a new tab or bring your tab to foreground. Here you will see all your created model fields.
TIP
Have also a look on the top right you have two small icons: Three dots and an arrow down.
- The three dots will give you extended options for this model.
- The arrow down will open the endpoint url overview with more details to your API
Enum View
Click on an enumeration in the navigation tree will open a new tab or bring your tab to foreground. Here you will see all your created enumeration items.
Create enumerations
Create a new enumeration, by clicking on the "Create Enumeration" sub-item in header, you run into a new view.
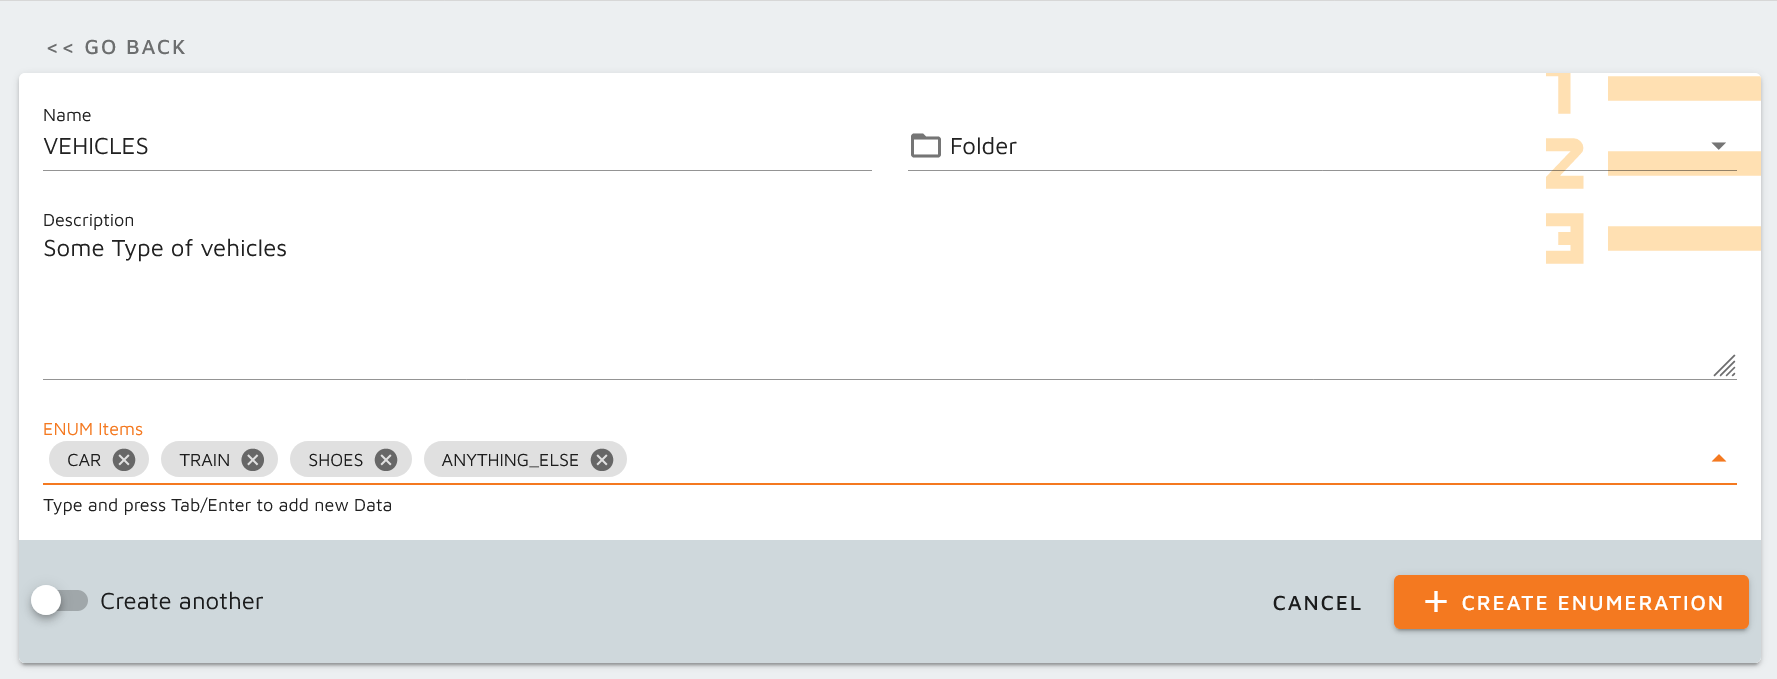
Here you can set the name, the description (used in swagger and code) and your enumeration items. All names will be uppercase to separate the enumerations and models in code. It is much easier to see, what type of field it is.
Create models
Create a new model, by clicking on the "Create Model" sub-item in header, you run into a new view.
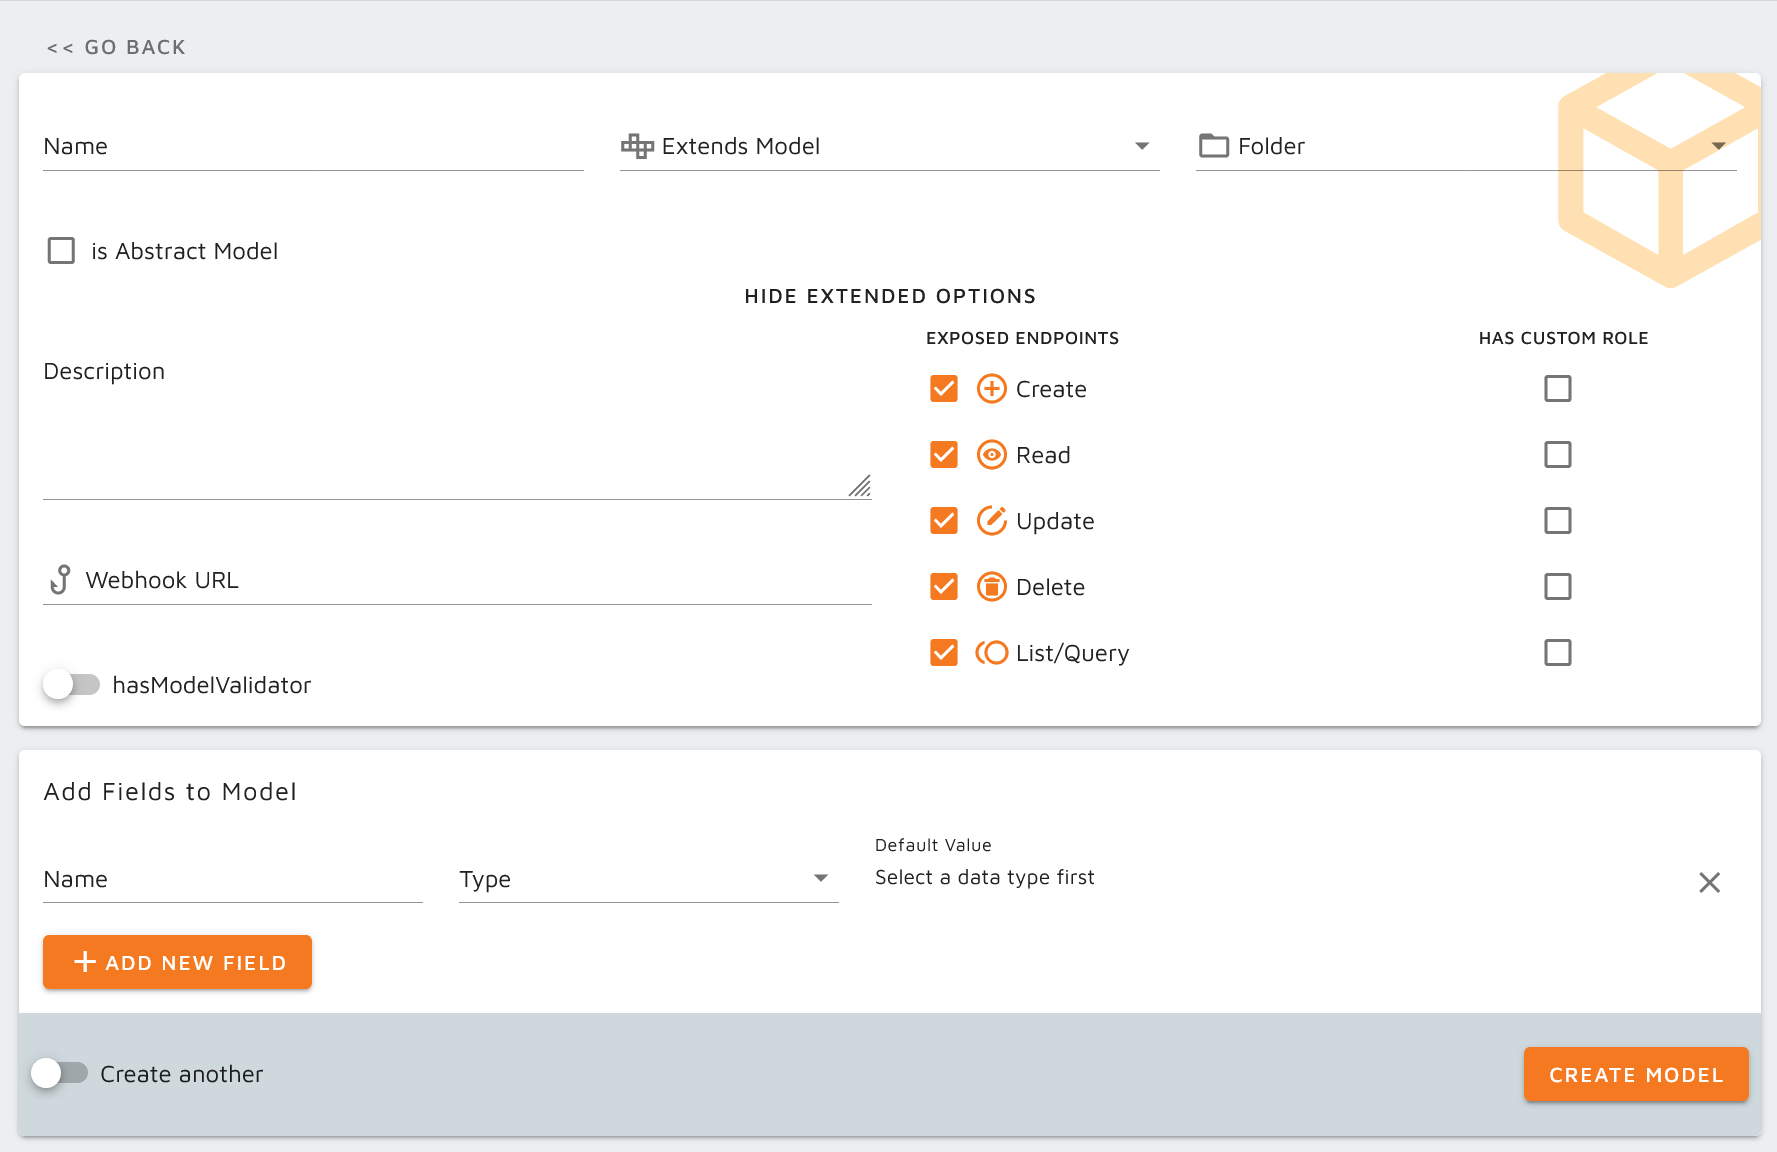
- Add your model name (only A-Z lower/upper, 0-9 and underscore allowed. See Java Models for reference)
- You have already created a parent abstract model? Then enter the field "Extends Model"
- You will group the models? Then create or select a folder in "Folder" field.
- Check the "is abstract model" checkbox, if you want to create a "parent" and abstract model. see: features abstract model
- Extended Options:
- Add a description to your model. It will be shown in swagger-doc to describe your data.
- Add a webhook url -> Ping a message system (Work/Redesign in progress)
- Add a model Validator see: custom model validators
- Select exposed endpoints and define custom roles see: roles and access
- Add fields to model or remove the first item
- Choose "create another" if you want to be redirected to a new creation form, after you are done.
WARNING
If you use folder, we add the Folder Name as prefix for the model itself. We will update to a package based model structure, see roadmap for details.
Create model fields
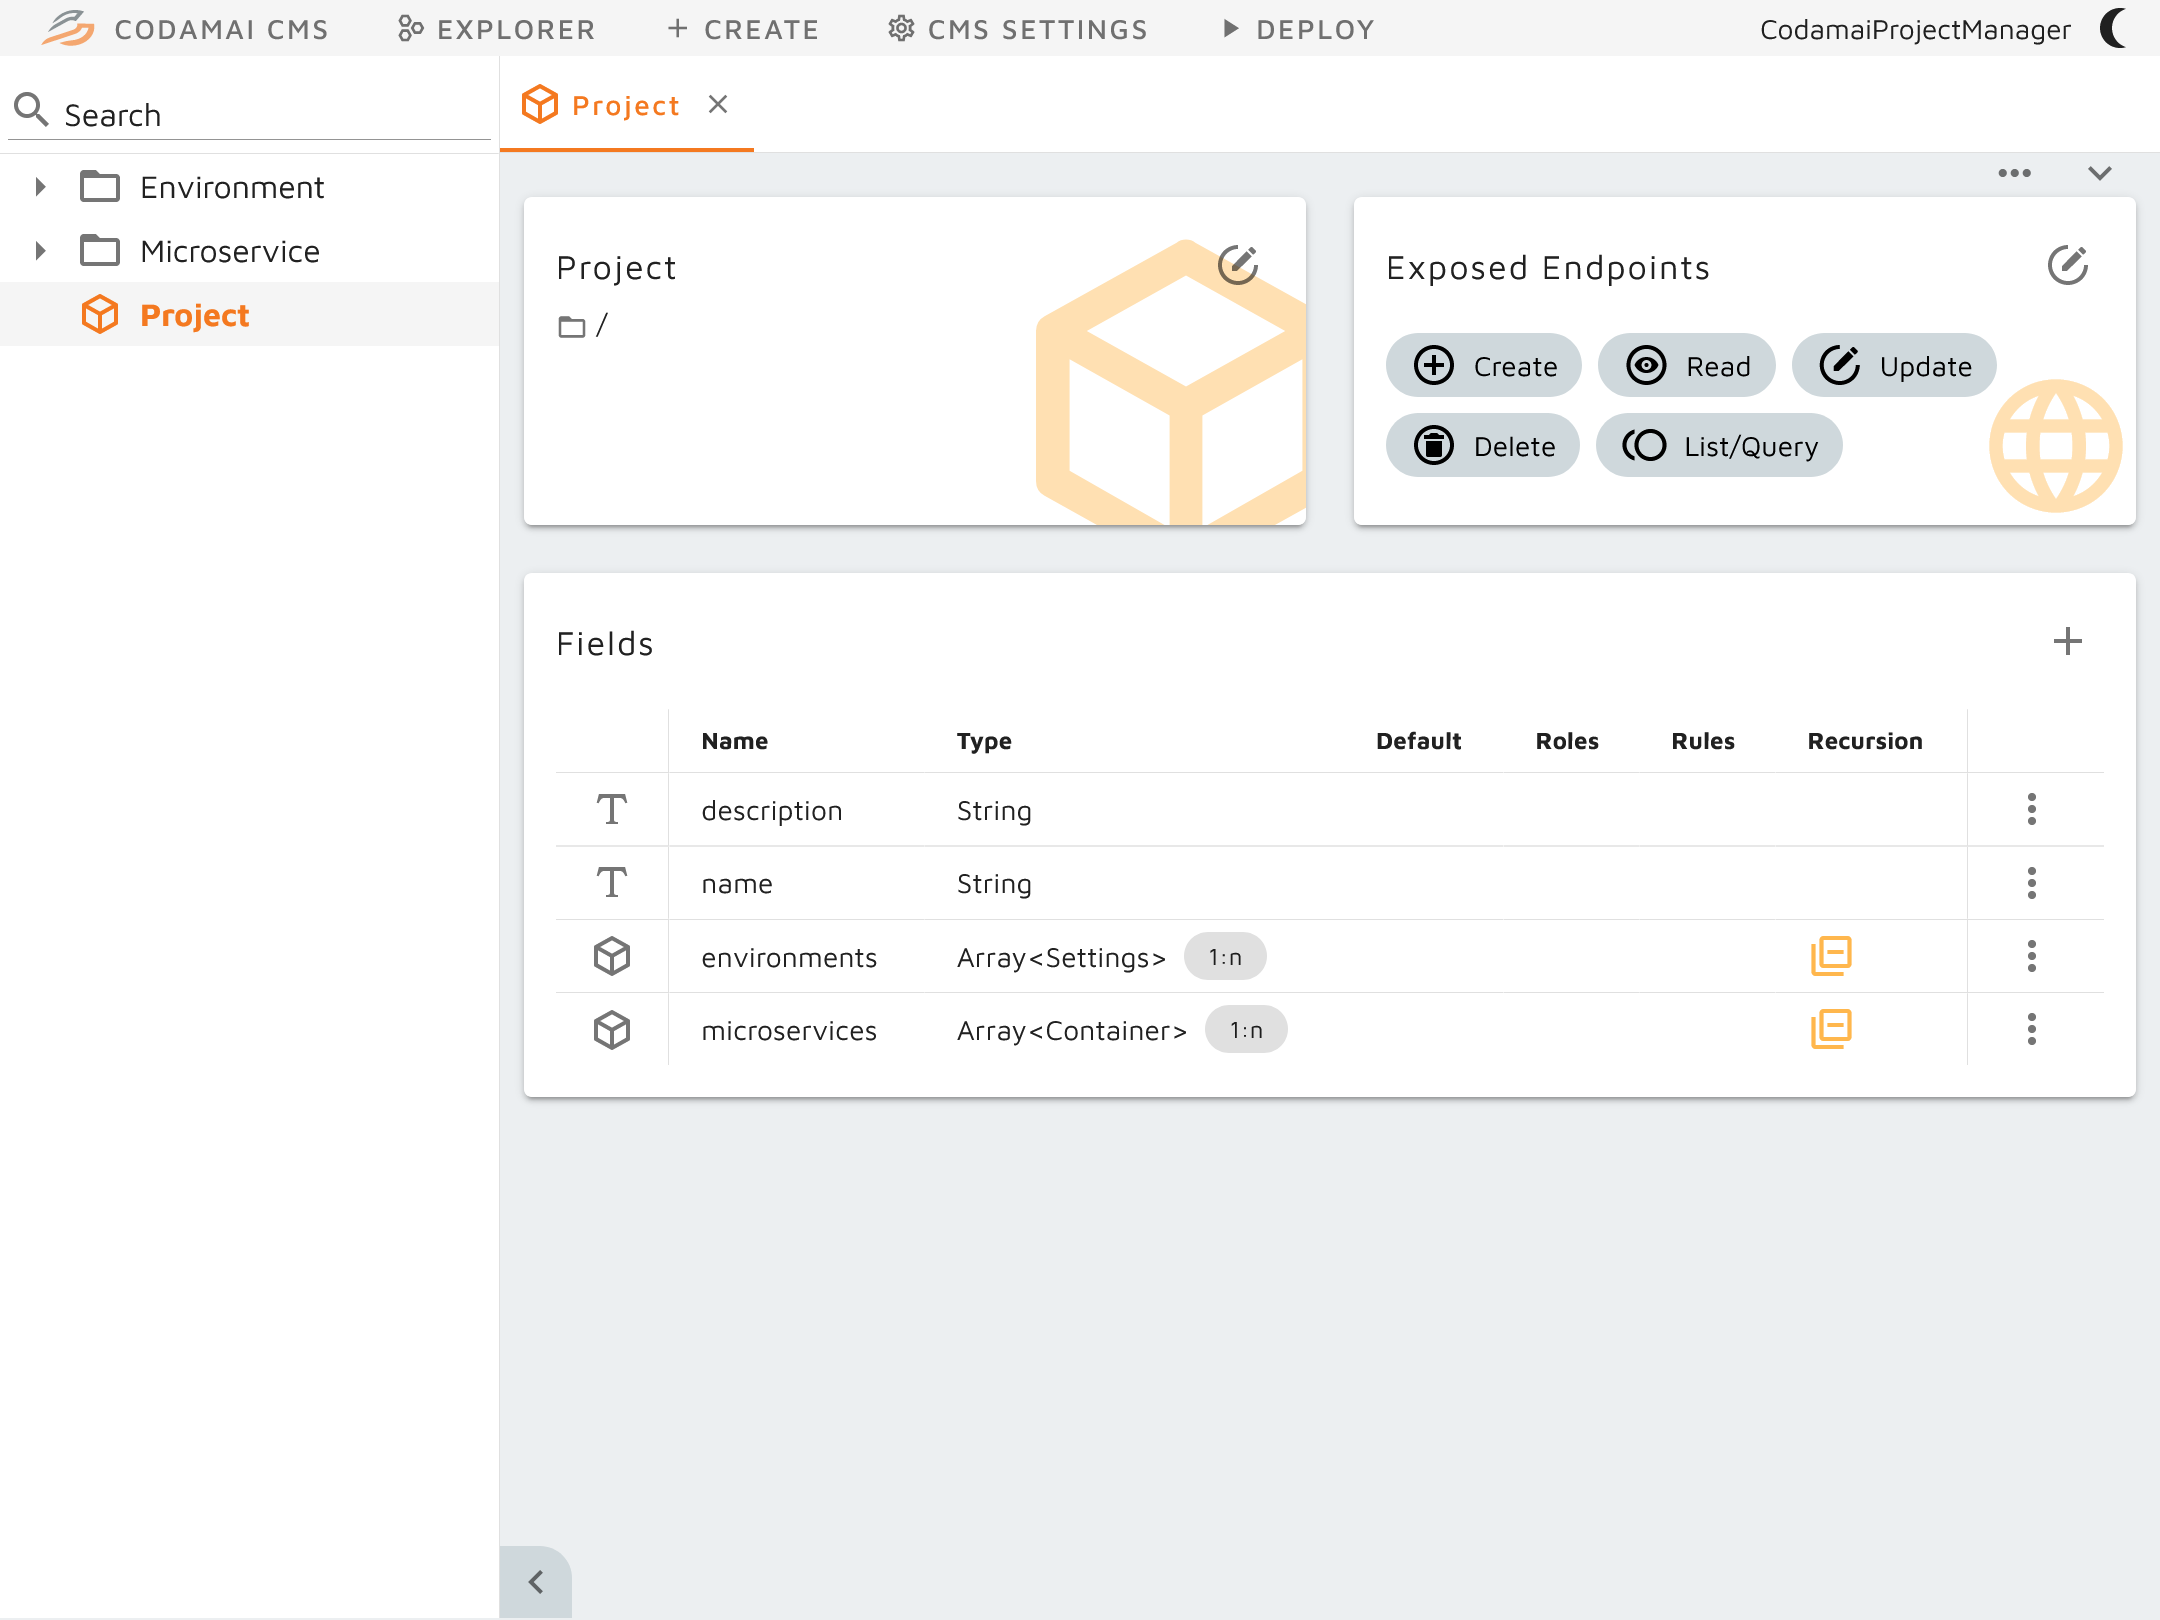
To create a new model field you can click the plus button on top right in the field table.
It will open a dialog where you can choose the base type of your fields.
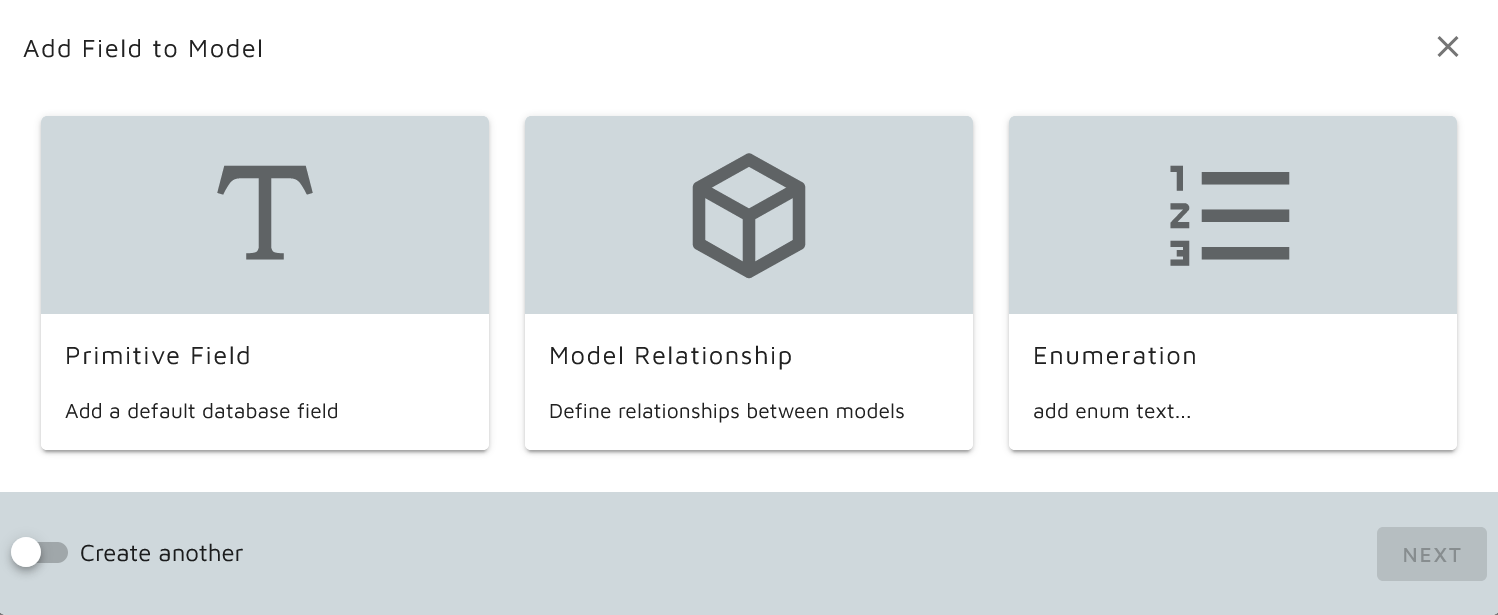
Primitive Field
A primitive field is a simple field like:
- String
- Integer
- Double
- Float
- Boolean
- Time
- Date
- Datetime
Initial Values
You can set initial values for each primitive type. For String, just enter the initial value. Double and float with dot (0.0). Integer just with the number and enumerations can be selected.
TIP
For Date, Time and Datetime you can set just "now" (without "") and you will always get the current time on initial creation.
Model Relationship Field
A relationship to another model. Have a look at our UML Model-Diagram, and you will find the markers "n:m", "1:n", "n:1", "1:1". Each of them can be set here, and link to other models you have created.
A back reference will create by the system in the opposite model. Change the name of the reference, to document this field.
Quick Cheat-Sheet about relationships
| Relationship | Name in CMS | Field in Model | Field in Reference Model |
|---|---|---|---|
| 1:1 | One-To-One | Object | Object |
| 1:n | Many-To-One | Object | List |
| n:1 | One-To-many | List | Object |
| n:m | Many-To-many | List | List |
TIP
If you name your relationship field "children" and it is a list, the back reference will be named "childrenReference". You can (and should) rename the "childrenReference" to "parent".
Model field recursions
On create, update, delete operations you can use recursion to update more than one object. So you can do multiple changes at once. This is perfect to avoid multiple calls.
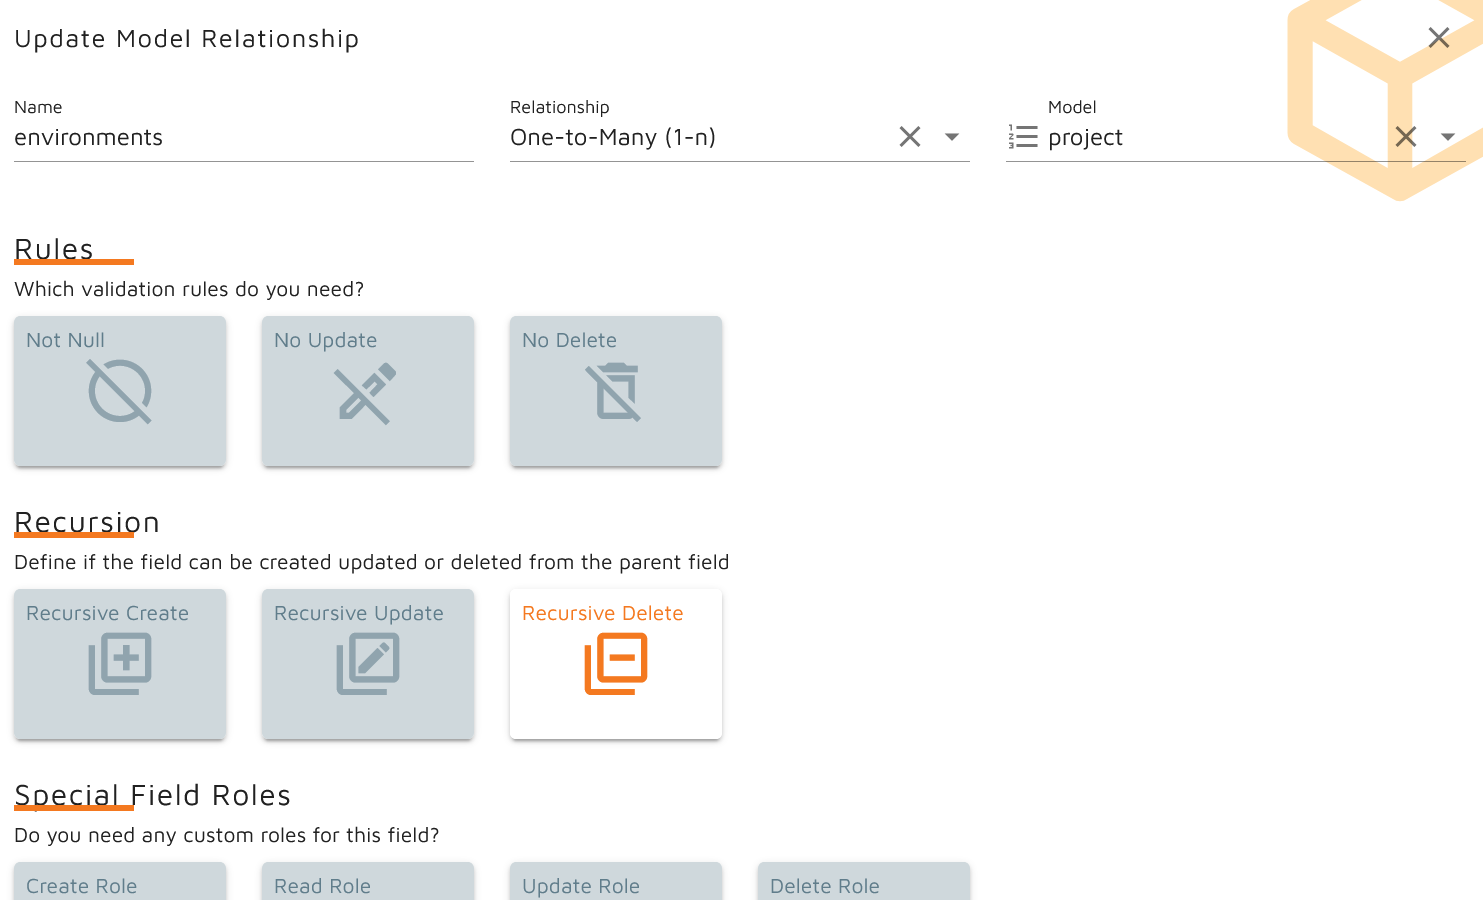 Set the operation types you want to allow to be updated in recursion.
More information at the feature page: see: recursive operations feature
Enumeration Field
Simple field, connected to an enumeration. You can set a default item of this enumeration, if null is set in creation process, then this selected value will set to the field. It does not affect the update process.
Rules of fields
Each type of models and each type of field can have different rules. A string field have other rules, as an enumeration field. But booth can have a not null rule.
 Rules of an enumeration field.
- not null: This value can not be null, not nullable in database column
- no update: This field can only be set on creation. No update possible.
- no delete: you can change this value but not set to null.
- unique: Unique field in database (for this tenant, if multi tenant see: feature multi-tenant)
- min. length: (String) Min. length of string, (integer, Double, Float) Min. number
- max. length: (String) Max. length of string, (integer, Double, Float) Max. number
- Long text: Will be created the blob column in database
- Decrypted: The field will be decrypted in database see: feature database field decryption)
- Validation Pattern: Validate Strings by a pattern
- in the past: Date or DateTime must be in the past
- in the future: Date or DateTime must be in the future
Special field roles
Sometimes you need to specify access to field directly. This is possible with special field roles. see: roles and access for more information about roles and access.
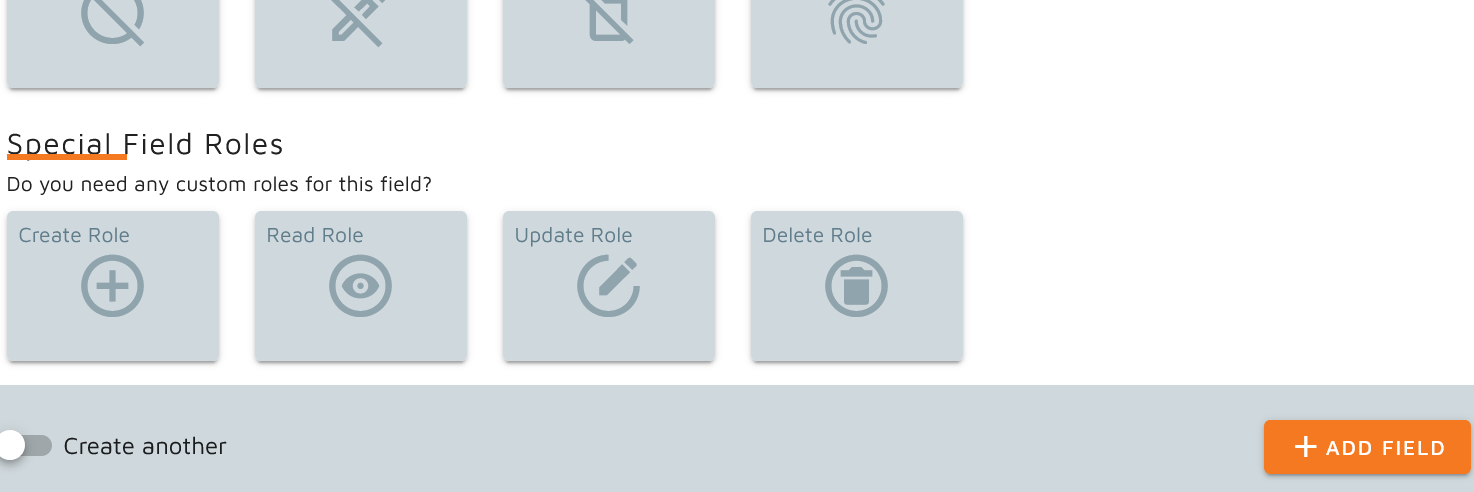
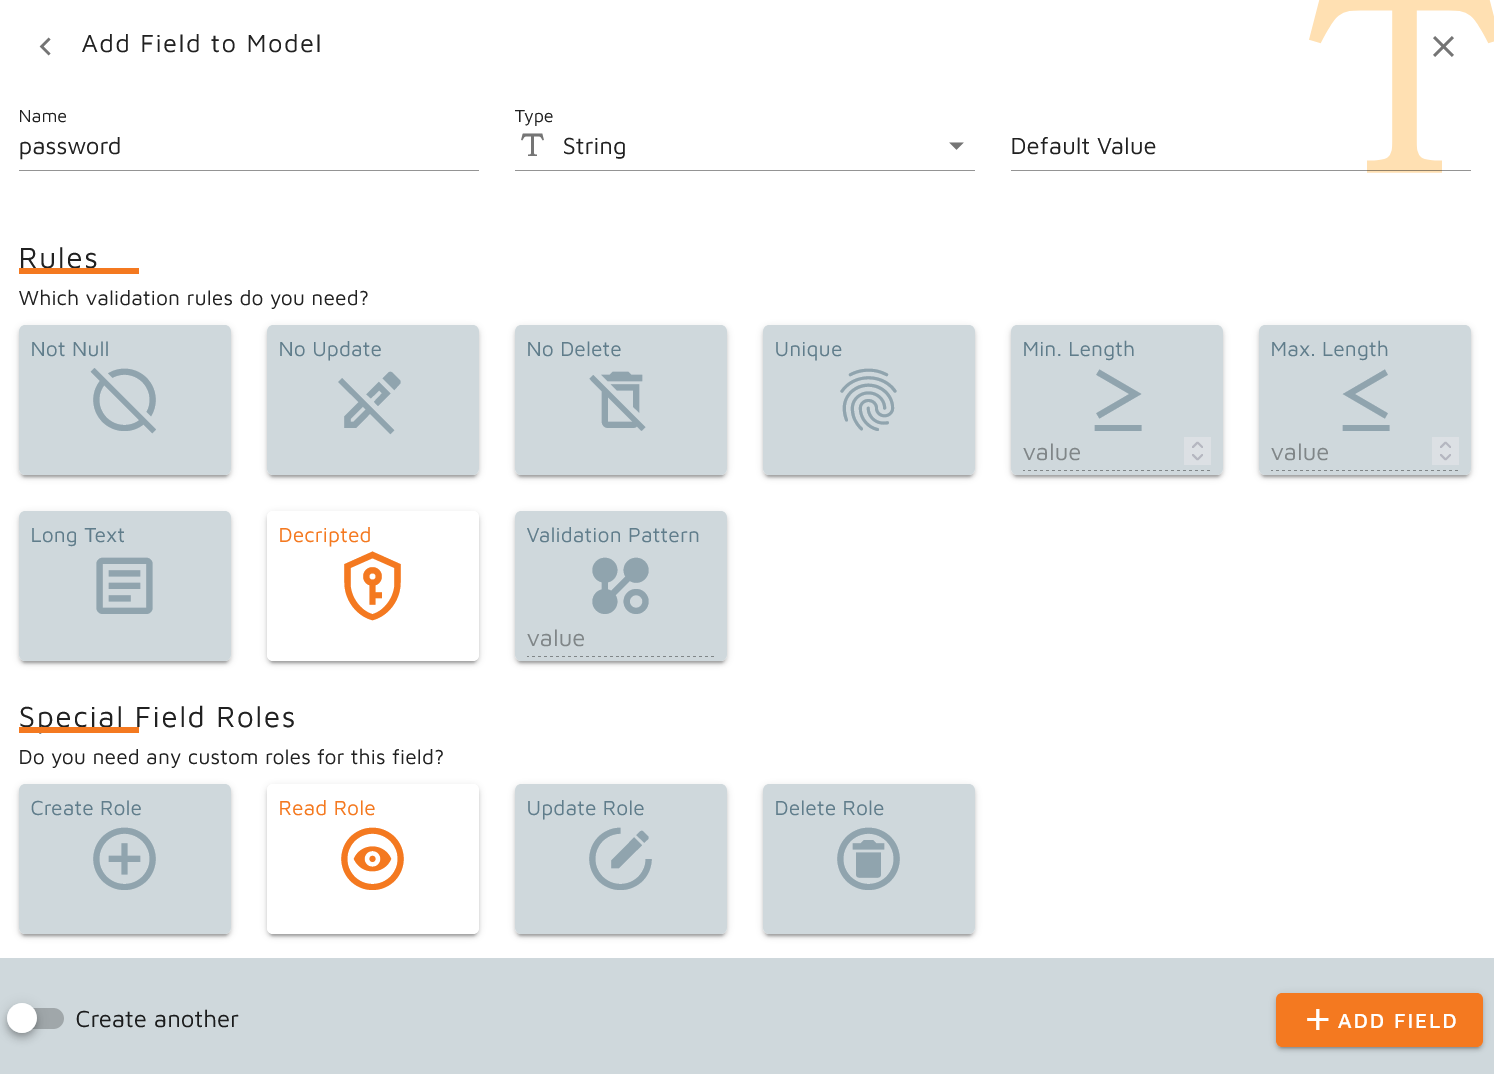
Example Use-Case: Password Field
One use case is a password field. Let's say you will save a password in the database. Add the field, add the "decrypted" rule and set the "special field role" for "read". So the CMS will not return the "password" field, expect you are an admin or a technical user with this special role.
Deploy your cms
Now you have created all your models, enumerations and relationships, like designed in your UML Diagram. Great.
Let's prepare the project and deploy your CMS to your Code Repository. Go to the CMS Settings via top menu bar.

We can have a quick look on the project settings. You can set your own version number, change the description and project name. The core version defines the dependencies and the code base, we build for you.
see: release notes and see: api
TIP
We are adding some more properties here in the near future. Check our roadmap, to see our ideas.
Now the deployment itself. Got to the "Git Credentials" Tab. Here you can add your credentials. Use Username / Password or create a new keypair for SSH and add the private key here. We use it to pull and push your given repository.

TIP
Bitbucket has great User / App-Key Settings, where you can give access only to do this two actions. Use the User / Password and add App-Key to the password field. So you can be sure, we don't do anything bad 😃
Add the full URL to your repo, set the branch we commit to (Example: use a branch name "cms" -> we will pull the default, add our code, and push to "cms". Then you can create a pull request and have a look, what's happening)
Last but not least, go to the "deploy" in the top menu bar
Add a commit message and click on deploy. If everything is ok (credentials are working, everything is fine, the pipeline is running), you will get a short message on footer, that the system is running now.
Have a look into your repository, and you will see our commit a few minutes later.
Finally, you can check out your repository on your local environment for testing.
Database Environments
These are the required environments for the database connection.
| Environment | Description | Example |
|---|---|---|
| cms_database_mode | Database mode, see multi tenant | multi |
| cms_database_driver | jdbc-driver class | com.mysql.cj.jdbc.Driver |
| cms_database_url | url to database | jdbc:mysql://172.18.0.2:3306/ |
| cms_database_prefix | Prefix for database (database name) | cms |
| cms_database_user | database user | mysqluser |
| cms_database_password | Password for database user | test-1234 |
Run your cms
Ok, so you checked out the repository. Now lets test the CMS with docker compose.
You should have two files (if not create them):
- Dockerfile
- docker-compose.yml
Let's have a look into your Dockerfile, it should be like this:
FROM openjdk:17-jdk-alpine

WORKDIR /data

ENV DEBUG=false
ENV TZ=Europe/Berlin
RUN apk update
RUN apk add ca-certificates curl
RUN update-ca-certificates
RUN rm -rf /var/cache/apk/*
COPY target/GenoBuy-0.0.1.jar ./all.jar
RUN touch ./run.sh
RUN echo "#!/bin/sh" >> ./run.sh
RUN echo "/opt/openjdk-17/bin/java -jar /data/all.jar -Djava.net.preferIPv4Stack=true" >> ./run.sh
RUN chmod -R 0777 ./
EXPOSE 8100

HEALTHCHECK CMD curl -f http://127.0.0.1:8101/actuator/health/ || exit 1;

CMD ["./run.sh"]
And now the docker-compose.yml
version: '3.5'

networks:
  codamAI_cms:
    name: 'my-network'

volumes:
  mysql_codamAI_cms:
    name: 'mysql-cms'
  mysql_keycloak_data:
    driver: local

services:
  mysql_keycloak:
    container_name: codamAI_auth_mysql
    image: mysql:5.7
    restart: unless-stopped
    networks:
      - codamAICmsCreator
    volumes:
      - mysql_keycloak_data:/var/lib/mysql
    environment:
      MYSQL_ROOT_PASSWORD: ChangeThisR00tPassw0rd
      MYSQL_DATABASE: keycloak
      MYSQL_USER: keycloak
      MYSQL_PASSWORD: ChangeThisUs3rPassw0rd

  mysql_cms:
    container_name: codamAI-cms-mysql
    image: mysql:5.7
    restart: unless-stopped
    networks:
      - codamAI_cms
    volumes:
      - mysql_codamAI_cms:/var/lib/mysql
    environment:
      MYSQL_ROOT_PASSWORD: ChangeThisR00tPassw0rd
      MYSQL_DATABASE: cms
      MYSQL_USER: mysqluser
      MYSQL_PASSWORD: ChangeThisUs3rPassw0rd

  keycloak:
    container_name: codamAI_auth
    image: jboss/keycloak:15.1.1
    restart: unless-stopped
    deploy:
      restart_policy:
        delay: 5s
        max_attempts: 3
    networks:
      - codamAICmsCreator
    ports:
      - "5100:8080"
    volumes:
      - keycloak_theme:/opt/jboss/keycloak/themes/
      - keycloak_deployments:/opt/jboss/keycloak/standalone/deployments/
    environment:
      DB_VENDOR: MYSQL
      DB_ADDR: mysql_keycloak
      DB_DATABASE: keycloak
      DB_USER: keycloak
      DB_PASSWORD: MKrORTw8pmnAkjV99yCn7cqJ9
      KEYCLOAK_USER: changeAdminNameHere
      KEYCLOAK_PASSWORD: changeAdminUs3rNameH3re
    depends_on:
      - mysql_keycloak
  cms:
    container_name: codamAI-cms
    build:
      - ./
    ports:
      - "8100:8100"
    networks:
      - codamAI_cms
    environment:
      cms_database_driver: com.mysql.cj.jdbc.Driver
      cms_database_prefix: cms
      cms_database_mode: single
      cms_database_url: jdbc:mysql://mysql_cms:3306
      cms_database_user: mysqluser
      cms_database_password: ChangeThisUs3rPassw0rd
      auth_url: https://localhost:8443/auth
      auth_realm: myrealm
      auth_client: cms
      AUTH_SSL: EXTERNAL
      auth_admin: newKeycloakAdminName
      auth_password: newkeycloakpassword
      cms_user_management_client: keycloak.v15_0_2
      TZ: Europe/Berlin
      CYPHER_PASSWORD: your16digitkey00
    depends_on:
      - mysql_cms
RUN the cms
OK, now lets run the CMS simply by run the following command in the Shell (Terminal, Cmd, whatever):
docker-compose up
WARNING
On the first run, the CMS won't come up, because keycloak is not yet configured. But you just need to create an admin user and a realm for the cms. The CMS will create a new client and all the roles it needs to work on startup.
Read the keycloak documentation for more information see: keycloak documentation
On any errors read our troubleshooting guide see: troubleshooting guide
Add users in multi tenant mode
Connect via API
If everything is fine, lets test the API Endpoints by open the swagger ui.
Open Swagger UI local - https://127.0.0.1:8100/swagger-ui/
If you get the api documentation, you are ready to use the CMS.
If not: see: troubleshooting guide
Extend the CMS
WARNING
Don't change the generated files. You can add Clients based on Interfaces for every part of the CMS. Files you can change:
- pom.xml
- Custom Hooks
- OpenAPI Configuration Java File
