Features
Overview
Database Server
As default, we use the MySQL Database. But you can also configure Postgresql, MSSQL or MariaDB. You can define your database by change adding a JDBC Driver to pom.xml and define the driver and path on the start script configuration.
Configure Database
You can configure the database for your own. The CMS will fetch the following variables from the ENVIRONMENT of your system.
cms_database_driver=com.mysql.cj.jdbc.Driver
cms_database_prefix=cms
cms_database_url="jdbc:mysql://172.20.0.3:3306"
cms_database_user=test
cms_database_password=passW0rd
Basic Configuration
Required environments:
cms_database_driver This is the JDBC-Driver path. You get it from your current JDBC Provider. We tested with MySQL, MariaDB and MSSQL.
cms_database_prefix This is the name of your database in single tenant mode). In Multi Tenant mode it is the name of your system-database and the prefix for all tenant databases. so if you have “cms” the tenant-database name is “cms-tenant-identifier“ Have a look at the page about Single and Multi Tenant Systems.
cms_database_url The jdbc path to your database. With docker-compose you don’t need to set the ip, just add the container name. This is default in the generated docker-compose file.
cms_database_user This is your database user. Don’t use root 😃
cms_database_password A long and secure password for your database user.
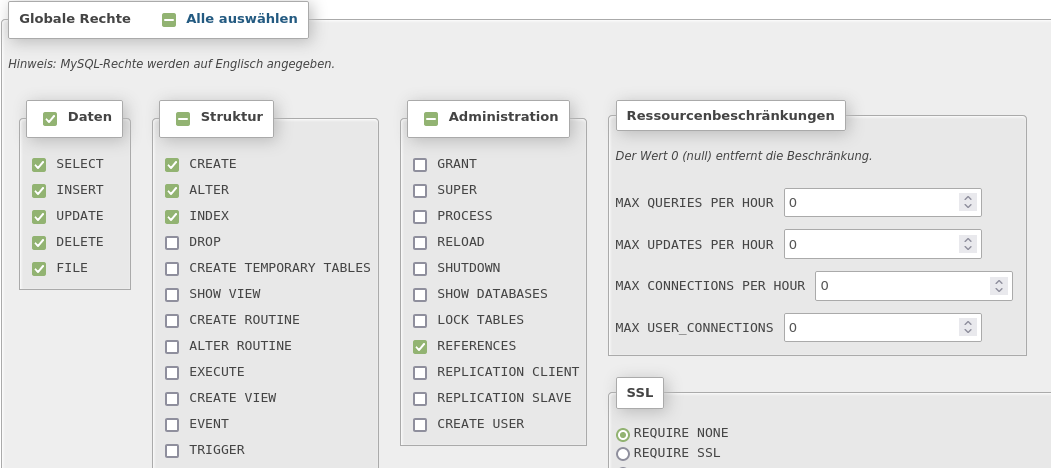
database user permission
 User permission for user in database. Example for MySQL.
Authorisation
We have two main user management options. At first an internal user management client. You can use it for test and developer purpose. For production use we recommend using a different option, the external identity management. This is the recommended way, because the CMS should not store the passwords side-by-side with application data. We use the Keycloak Identity Management System.
TIP
If you use, know or need another authorisation server, please feel free to contact us.
Clients
- keycloak
- intern
- none
Configure Authorisation
cms_user_management_client=keycloak.v15_0_2
auth_url=https://yourdomain.com/auth
auth_realm=test-cms
auth_client=cms
AUTH_SSL=EXTERNAL
auth_admin=kc-admin
auth_password=Passw0rd
cms_user_management_client This is the key for the client, the CMS should use. Get a list of all possible keys from Codamic Innovations GmbH.
auth_url This is the URL to your keycloak. It could be the internal url from your docker container. With docker it could be “http://keycloak:8080/auth“.
auth_realm The realm id your will use for your application and Single-Sign-On. It hold all your users, password rules, etc.
auth_client The client name for your CMS client. Use one client for CMS, don’t reuse it. Frontend or backend systems will have their own clients.
AUTH_SSL Settings for keycloak, just set as EXTERNAL.
auth_admin Your technical user in the keycloak master realm.
auth_password Password for your technical user.
TIP
Best practices for keycloak:
Setup and start your keycloak server (or use the docker compose) add a new technical user with access to whole system run the CMS, and it will create a realm, a client and all required roles in the client and realm.
At least remove all write access roles from the technical user.
Own authentication clients
You can create your own client, by implementing a @Component annotated class in the package com..
Create two classes. The first one is the user client and implement the com.codamai.cms.users.interfaces.UserClientInterface interfaces.
Example
@Component
@ConditionalOnProperty(name = "cms_user_management_client", havingValue = "yourclient.v1_0_0")
public class YourClient implements UserClientInterface {
    // ...
}
Implement all required functions as the function name and the interface description describes.
The second class is the authentication server setup and implement the com.codamai.cms.users.interfaces.AuthenticationServerInterface interfaces.
@Log4j2
@Component
@ConditionalOnProperty(name = "cms_user_management_client", havingValue = "yourclient.v1_0_0")
public class YourClientServerSetup implements AuthenticationServerInterface {
    // add realms, clients, roles and everything you need in setup() function.

    // [...]

    // find all roles in your cms
    private void setRealmClientRoles() {
        try (ScanResult scanResult = new ClassGraph().whitelistPackages("com.codamai.cms.models").scan()) {
            ClassInfoList classInfoList = scanResult.getSubclasses(AbstractModel.class.getName());
            classInfoList.forEach(model -> {
                @SuppressWarnings("unchecked")
                Class<? extends AbstractModel> classType = (Class<? extends AbstractModel>) model.loadClass();
                log.debug("Check roles for model " + classType.getSimpleName() + ".");
                initRolesForModel(classType);
            });
        }
    }

    // init roles in your authentication server here
    public void initRolesForModel(Class<? extends AbstractModel> modelClass) {
       // add your code
    }
}
Start your CMS with environment cms_user_management_client = yourclient.v1_0_0
Multi Tenant
In the start script you can choose the CMS - Mode. There are two options. Single Mode or Multi Tenant Mode. The single mode is for one company only, where you don’t have different companies or groups of user that you want to stay different. Multi User Mode is for something like Accounting-Applications, where you don’t want to have the data of all users in one database.
In the codamAI headless CMS you can separate data from different tenants. This is a perfect solution for SaaS-systems, where different companies uses one platform. For each company you will have a separate database. And if the user decide to leave your application, you can easily remove all the user data just by deleting the database table and the user tenant row.
Configure Tenant
If you enable the multi tenant database mode, the first database is named like your prefix (cmstest in upper example). It contains all user and tenant data. If you want to add tenants manually, this is the right point.
If you just use the single tenant mode, all data are stored in the database named like your prefix (“cmstest“ in this example). There is no user to tenant connection database.
 view of multi tenant mode with different tenants
cms_database_mode=single
cms_database_mode=multi
Model Types
TIP
Model types only have effect in multi tenant model see: multi tenant mode
| Type | Singleton | User | Tenant | System |
|---|---|---|---|---|
| User | no | unlimited | ||
| User | yes | only one | ||
| Tenant | no | unlimited | unlimited | |
| Tenant | yes | only one | only one | |
| System | no | unlimited | unlimited | unlimited |
| System | yes | only one | only one | only one |
User Model
Only the user can see and interact with his models. Other users in the system or the tenant can't see them.
Example: A user model could be used for "MyFavorites". A link to websites or models or something else.
Tenant Model
This is the default. All user in one tenant can see and interact with this model. Other users from other tenants can not access to this data.
Example: A tenant model could be used for nearly everything like "Customers". All users in the tenant can see the data. (role required of course)
System Model
This is a system model, for system settings. All users from all tenants can access them, if they have the role of the model.
Example: A system model could be used for cross tenant data like "PublicFAQ" (everyone can read, but only some administrators have role to change)
Singleton Type
You can create all models as singleton type. Then only one row in the range can be created.
Example 1: A user model with singleton could be used for "UserSettings".
Example 2: A tenant model with singleton could be used for "CompanySettings" (or individual theme settings per company).
Example 3: A system model with singleton could be used for "SystemSettings".
Technical user
Administration users (technical accounts) can get access to users object to run workflows. see: access management
Parent abstract data models
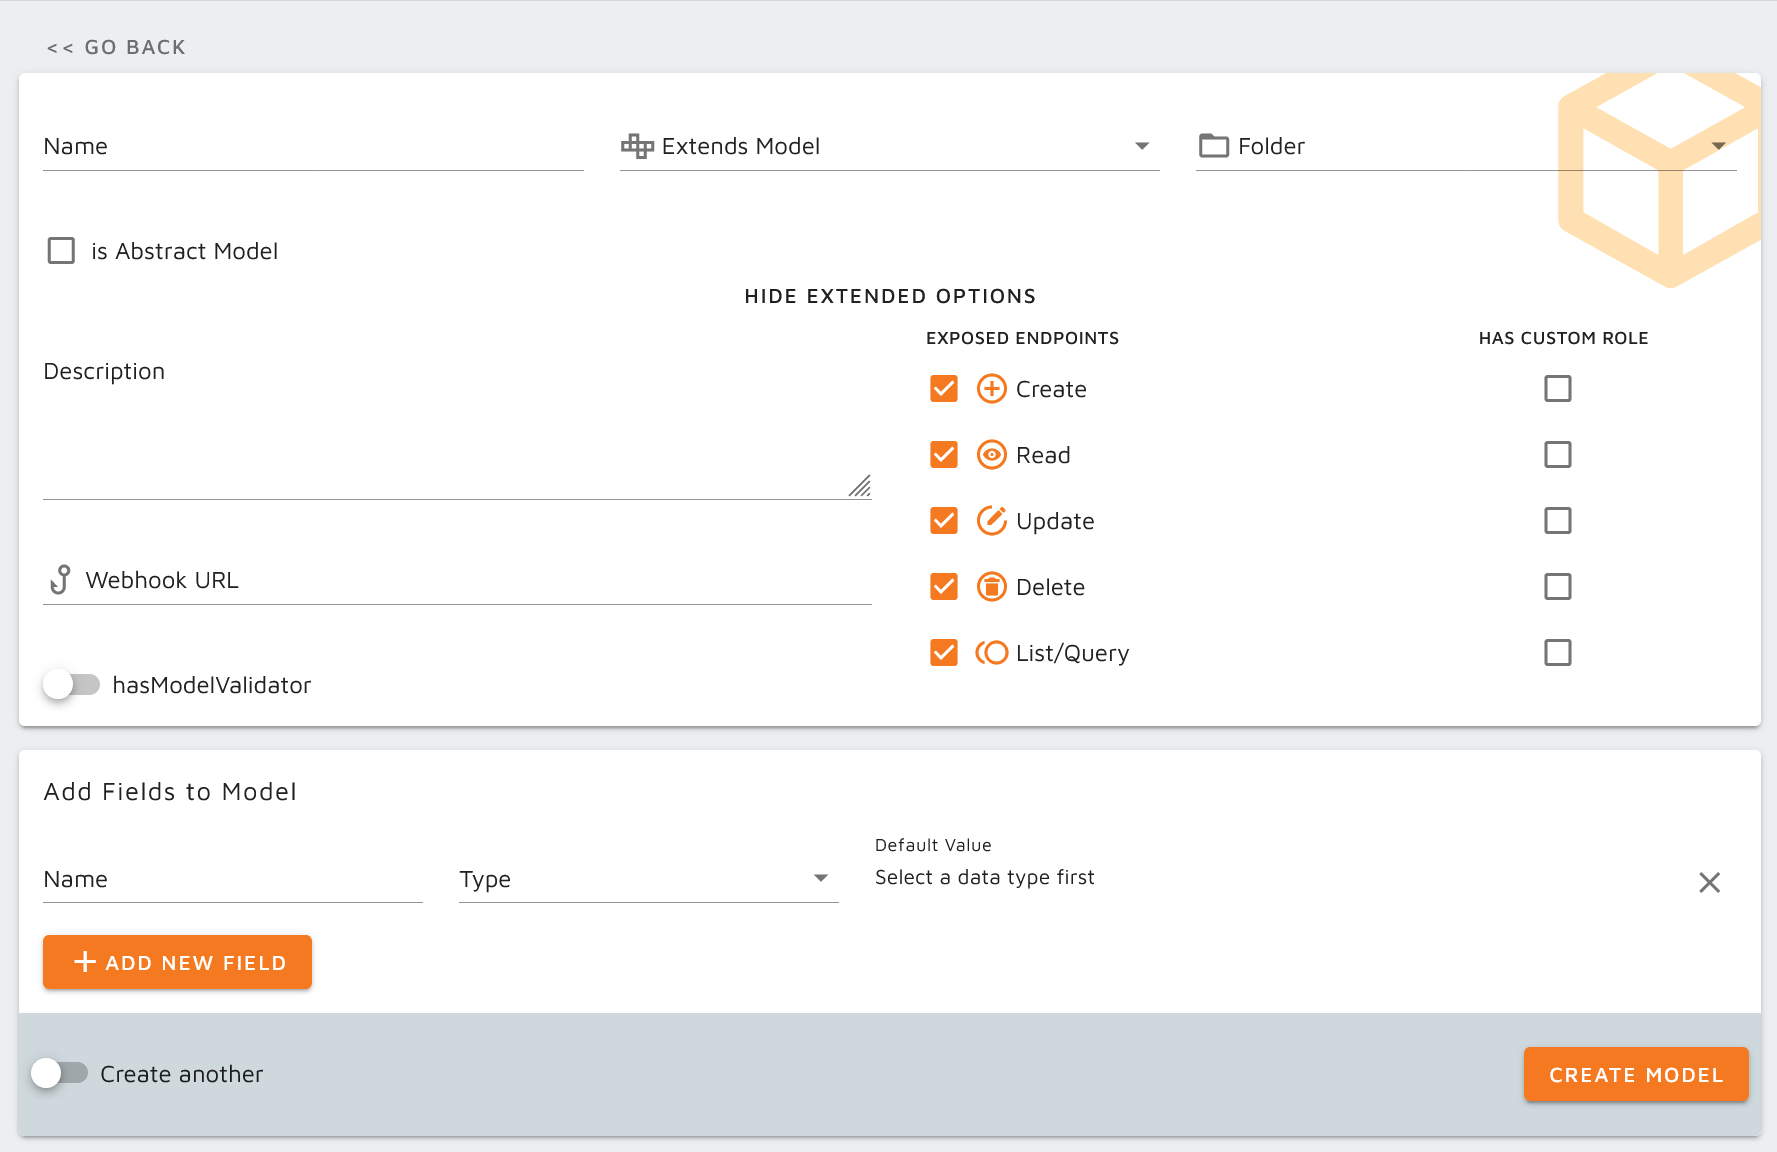
You can create an abstract parent model, to extends other classes. Each model will automatic include autogenerated "id", "_created_on" and "updated_on" as fields.
Example:
Model Person:
| field | type |
|---|---|
| lastname | string |
| firstname | string |
Model Customer extends Person
| field | type |
|---|---|
| customerNumber | string |
| openInvoice | number |
Model Employee extends Person
| field | type |
|---|---|
| birthday | string |
| holiday | number |
The employee will have lastname, firstname, birthday and holiday as field.
Database field encryption
If you need to encrypt your data in the database, then you can add the decrypt-rule to each field. Then you can't read the data in the database field any longer. We encrypt with cypher "AES/ECB/PKCS" industrial standard.
How it works
If you create or update a model, the field will be encrypted. If your read the data model, we decrypt it before you receive it in readable form. Use special field roles for read, to avoid fetch the data if you don't need it.
Encryption Environment
Set the CYPHER_PASSWORD environment to an 16 digit key, you can choose. see: java documentation for more information
Custom Model Validator
You need to check your data with more complex methods? No problem. Activate a custom model validator in the model edit.

Check "hasModelValidator" and we create a new file for you, a custom model validator file in the "hooks" package. It will implement an interface named "HookInterface" with some methods, you need to create.
Here you can check the model, fetch other content from database and compare, etc. If your validation fail, just throw an exception.
- beforeDatabaseChange: Just before we put the field into database, but before Data Encryption
- afterDatabaseChange: Right after database change, maybe you will do something with the id.
- fieldBeforeDatabaseChange: One single field validation, while validation
- fieldOnDatabaseRead: One field, in read (or list) request
Recursive Operations
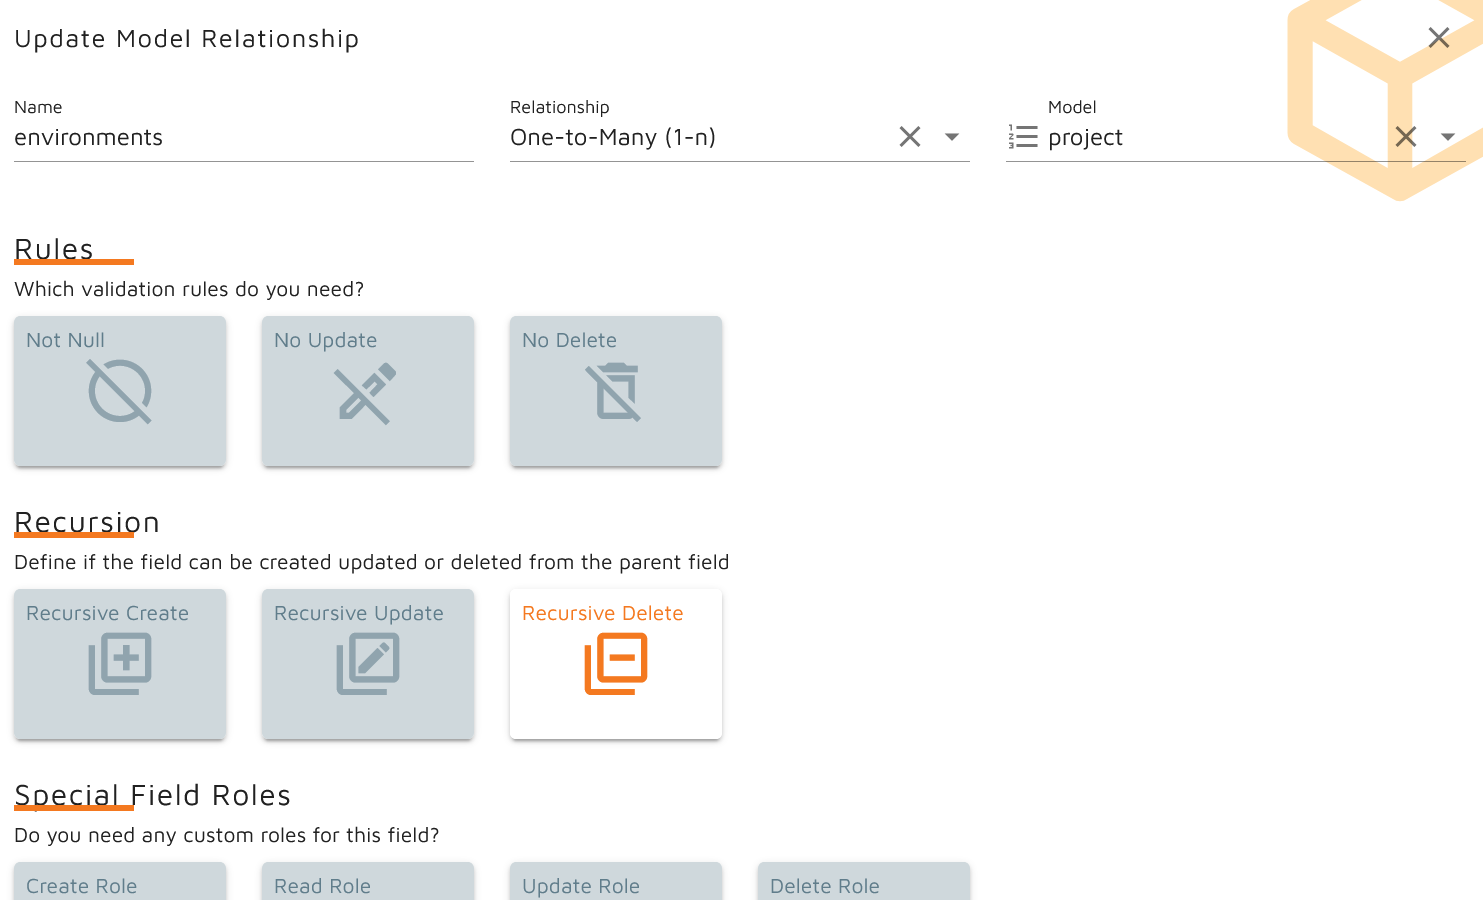
Another great feature of this CMS are the recursive operations where you can create, update or delete multiple datasets at once. Each reference field to other models can be used with recursive attributes. So you can change a set of database rows over different tables with just one call from client.
 You can set the model field recursion in the field settings of each "relationship" model field.
How recursion works - overview
- Create object with new reference object with recursive create flag create new objects
- Create object with new reference object without recursive create flag - throws NoRecursiveCreate exception
- Create new object with existing reference with recursive update flag create object and update reference
- Create new object with not existing reference failed - nothing would be created
- Update/Patch object with new reference object with recursive create flag creates new reference and update object
- Update/Patch object with new reference object without recursive create - throws NoRecursiveCreate exception
- Update/Patch object with existing reference object without recursive update flag connect and not update reference
- Update/Patch object with not existing reference will fail - nothing would be created
- Delete object with recursive delete flag will delete referenced objects also
- Delete object without recursive delete flag will not delete but disconnect referenced objects
Table view of recursion
create reference objects
| with recursive create | without recursive create | |
|---|---|---|
| Create object with new reference object | create new object and reference | failed with NoRecursiveCreate Exception |
| Update/Patch object with new reference object | patch object and create reference object as new object | failed with NoRecursiveCreate Exception |
update/patch referenced objects
| with recursive update | without recursive update | |
|---|---|---|
| Create object with existing reference object | create object, recursive update reference | create object, connect but not update reference. |
| Update/Patch object with existing reference object | connect and update reference | connect and not update reference |
delete objects
| with recursive delete | without recursive delete | |
|---|---|---|
| Delete object | recursive delete all references | remove link to / from references and delete object |
Access management in recursion
You can set up your system, that users are allowed to update data by a field role, but don't update the data itself. This could be useful in combination with custom model validators.
Example: You will have an invoice with invoice items. If you update the invoice, you can calculate the total amount from all items and update a total field. If someone updated the item only, you can not recalculate the invoice.
{
  "data": {
    "foo": "bar",
    "otherObject": {
      "amount": "5"
    }
  },
  "parameter": [
    "+"
  ]
}
This is a typical recursive update call. You change the foo in the data and recursive update the otherObject.
Number Circles
For some reasons you need special dynamic identifiers. A famous example is a invoice identify number. Typically, it is build like “I-${yyyy}-${mm}-${counter}” and parsed it look like “I-2022-01-001“. So you add a field named “invoiceNr” and the CMS will create a “invoiceNr_pattern“ and “invoiceNr_data“. The pattern can be created or changed by a separate API.
Number Circle Pattern
A number circle pattern is the template for the pattern. You have a pattern, like I-{yyyy}{mm}-{ident}. The rhythm decides when to reset the counter of the identifier.
| Pattern | Rhythm |
|---|---|
| NONE | No reset of the ident sequence |
| MONTH | Reset the ident each month |
| YEAR | Reset the ident each year |
Open API / Swagger
We provided the Swagger UI for you to check the API of the CMS. You can open (or disable in firewall) the swagger UI with the URL http://%yourcms-ip%:8100/swagger-ui/.
Health-Check
We added health check endpoints from Spring Boot Actuator. They included a health endpoint on
http://%yourcms-ip%:8081/actuator/health or the metrics, etc.
